什么是 Jupyter 笔记本?
Jupyter Notebook 是一种极其强大的开源、基于 Web 的工具,可促进文档的创建。 提供技术文档或演示的途径有很多,但 Jupyter Notebook 可以嵌入可视化和执行实时代码。 能够利用文档来描述开发概念或规划很有用,但在文档中提供工作示例可能是一种更有效的信息传达方式。 本教程将介绍如何在 Ubuntu 18.04 LTS 服务器上安装 Jupyter Notebook 并通过 SSH 隧道远程连接到它。
预检:
- 本教程以 root 用户身份在自我管理的 Ubuntu 18.04 LTS 服务器上执行。
- 本教程假设您在服务器上安装了 Python 3 并使用了一些创建 Python 虚拟环境的方法。
如果您对如何开始使用这些主题中的任何一个感到好奇,请查看这些关于在 Ubuntu 上安装 Python 或如何在 Ubuntu 上设置 Python 虚拟环境的文章。
更新环境
在开始任何 Linux 系统工作之前,确保系统包是最新的总是一个好主意。 运行以下命令更新系统包:
[email protected]:~# apt update -y设置虚拟环境
首先要做的是设置 Python 虚拟环境以安装 Jupyter 包。 在使用 Python 时,最好将项目依赖项封装在虚拟环境中。 它可以防止系统级 Python 具有无关的包,并使项目中的依赖项管理更加直接。
要为 Jupyter Notebook 设置虚拟环境,请运行以下命令:
[email protected]:~# python3 -m venv jupyter完成后,通过运行以下命令激活虚拟环境:
[email protected]:~# source jupyter/bin/activate (jupyter) [email protected]:~#安装 Jupyter 包
现在环境准备好了,下一步就是安装 Jupyter 包。 Jupyter 是一个 Python 包。 要安装它,我们使用 pip 来激活虚拟环境。
(jupyter) [email protected]:~# python3 -m pip install jupyter Collecting jupyter Downloading https://files.pythonhosted.org/packages/83/df/0f5dd132200728a86190397e1ea87cd76244e42d39ec5e88efd25b2abd7e/jupyter-1.0.0-py2.py3-none-any.whl Collecting jupyter-console (from jupyter) Downloading https://files.pythonhosted.org/packages/65/de/8f9491c4b7e660a75a4eb54694292d918d2d29321936d26bad28cc0530a4/jupyter_console-6.2.0-py3-none-any.whl Collecting ipywidgets (from jupyter) Downloading https://files.pythonhosted.org/packages/56/a0/dbcf5881bb2f51e8db678211907f16ea0a182b232c591a6d6f276985ca95/ipywidgets-7.5.1-py2.py3-none-any.whl (121kB) 100% |████████████████████████████████| 122kB 1.8MB/s Collecting ipykernel (from jupyter) ... Successfully installed MarkupSafe-1.1.1 Send2Trash-1.5.0 argon2-cffi-20.1.0 attrs-20.2.0 backcall-0.2.0 bleach-3.1.5 cffi-1.14.2 decorator-4.4.2 defusedxml-0.6.0 entrypoints-0.3 importlib-metadata-1.7.0 ipykernel-5.3.4 ipython-7.16.1 ipython-genutils-0.2.0 ipywidgets-7.5.1 jedi-0.17.2 jinja2-2.11.2 jsonschema-3.2.0 jupyter-1.0.0 jupyter-client-6.1.7 jupyter-console-6.2.0 jupyter-core-4.6.3 mistune-0.8.4 nbconvert-5.6.1 nbformat-5.0.7 notebook-6.1.4 packaging-20.4 pandocfilters-1.4.2 parso-0.7.1 pexpect-4.8.0 pickleshare-0.7.5 prometheus-client-0.8.0 prompt-toolkit-3.0.7 ptyprocess-0.6.0 pycparser-2.20 pygments-2.6.1 pyparsing-2.4.7 pyrsistent-0.17.0 python-dateutil-2.8.1 pyzmq-19.0.2 qtconsole-4.7.7 qtpy-1.9.0 six-1.15.0 terminado-0.8.3 testpath-0.4.4 tornado-6.0.4 traitlets-4.3.3 wcwidth-0.2.5 webencodings-0.5.1 widgetsnbextension-3.5.1 zipp-3.1.0运行 Jupyter Notebook
(jupyter) [email protected]:~# jupyter notebook --allow-root [I 23:58:00.086 NotebookApp] Serving notebooks from local directory: /root [I 23:58:00.087 NotebookApp] Jupyter Notebook 6.1.4 is running at: [I 23:58:00.087 NotebookApp] https://localhost:8888/?token=8c42c6688b11e755bcc9afa8417cda781c9f0db9b9723f26 [I 23:58:00.087 NotebookApp] or https://127.0.0.1:8888/?token=8c42c6688b11e755bcc9afa8417cda781c9f0db9b9723f26 [I 23:58:00.087 NotebookApp] Use Control-C to stop this server and shut down all kernels (twice to skip confirmation). [W 23:58:00.090 NotebookApp] No web browser found: could not locate runnable browser. [C 23:58:00.090 NotebookApp] To access the notebook, open this file in a browser: file:///root/.local/share/jupyter/runtime/nbserver-18411-open.html Or copy and paste one of these URLs: https://localhost:8888/?token=8c42c6688b11e755bcc9afa8417cda781c9f0db9b9723f26 or https://127.0.0.1:8888/?token=8c42c6688b11e755bcc9afa8417cda781c9f0db9b9723f26 Or copy and paste one of these URLs: https://localhost:8888/?token=8c42c6688b11e755bcc9afa8417cda781c9f0db9b9723f26 or https://127.0.0.1:8888/?token=8c42c6688b11e755bcc9afa8417cda781c9f0db9b9723f26如果之前在本地安装了 Jupyter Notebook,则可以将提供的 URL 之一复制并粘贴到浏览器中并开始使用。 要连接到在远程服务器上运行的此 Jupyter Notebook,必须使用 SSH 隧道。 现在通过按住 CTRL + C 并在提示符下输入 y 来终止 Jupyter Notebook。
通过 SSH 隧道连接(Linux 或 macOS)
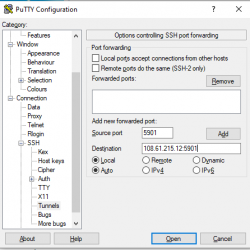
如果您使用的是 Windows 服务器,请考虑使用 Linux 子系统来运行这些指令。 要将本地端口转发到远程主机,Jupyter Notebook 应用程序运行以下命令。
ssh -L 8000:localhost:8888 [email protected]将上述命令中的主机名替换为远程服务器的 IP 或主机名。 这应该让您重新登录到您的服务器。
[email protected] ~ ssh -L 8000:localhost:8888 [email protected] Last login: Wed Sep 9 00:02:50 2020 from 10.255.233.139 [email protected]:~#运行和使用 Jupyter Notebook
重新连接到服务器后,通过首先激活虚拟环境来启动 Jupyter Notebook 应用程序。
[email protected]:~# source jupyter/bin/activate (jupyter) [email protected]:~#然后,重新运行应用程序:
(jupyter) [email protected]:~# jupyter notebook --allow-root [I 00:10:55.994 NotebookApp] Serving notebooks from local directory: /root [I 00:10:55.995 NotebookApp] Jupyter Notebook 6.1.4 is running at: [I 00:10:55.995 NotebookApp] https://localhost:8888/?token=c4d32d1701bccfdf8049be9832e1ef420f101402b11c0da8 [I 00:10:55.995 NotebookApp] or https://127.0.0.1:8888/?token=c4d32d1701bccfdf8049be9832e1ef420f101402b11c0da8 [I 00:10:55.995 NotebookApp] Use Control-C to stop this server and shut down all kernels (twice to skip confirmation). [W 00:10:55.998 NotebookApp] No web browser found: could not locate runnable browser. [C 00:10:55.998 NotebookApp] To access the notebook, open this file in a browser: file:///root/.local/share/jupyter/runtime/nbserver-18474-open.html Or copy and paste one of these URLs: https://localhost:8888/?token=c4d32d1701bccfdf8049be9832e1ef420f101402b11c0da8 or https://127.0.0.1:8888/?token=c4d32d1701bccfdf8049be9832e1ef420f101402b11c0da8现在可以获取输出中提供的 URL 之一,将端口更改为本地转发端口,然后通过本地计算机上的浏览器访问 Jupyter Notebook 应用程序。 例如:
https://localhost:8000/?token=c4d32d1701bccfdf8049be9832e1ef420f101402b11c0da8在浏览器中连接后,应用程序应如下所示:
而已! 要创建新的 Python 3 notebook,请单击右上角的“新建”下拉菜单,然后单击 Python 3:

您现在可以开始使用新的 Python 3 笔记本了!

结论
Jupyter Notebooks 是从 蟒蛇 执行。 它使我们能够生成、使用和共享包含代码、可视化、方程和其他叙述性文本的文档。 它的用途包括数据清理和修改、数值建模和模拟、统计表示、数据可视化、机器学习等选择! 它是数据科学家共享代码、原型设计和其他分析的默认选择。
想了解更多信息?
给我们打电话!
当您致电 1.800.580.4985 时,我们可以与您交谈。 您可以聘请我们知识渊博的解决方案提供商之一,他可以为您提供所需的信息,以便立即做出明智的决定。
忙到不想说话? 点击 这里 与我们进行快速聊天以了解更多信息。 您是否需要可以在闲暇时查看的电子邮件中的信息? 立即给我们发送电子邮件,以获得关于我们产品系列中哪种产品最适合您的需求的可靠建议。
我们期待与您交谈!


